How to remove child safety locks can feel like a big task. Parents often install them on doors, cabinets, and even appliances. Many brands make them, like Wappa baby and Safety 1st, and they come in forms such as Door knob covers, lever lock devices, and cabinet locks with sticky pads. Sooner or later, kids grow, and parents want to free up those doors, drawers, and fridges.
Wondering how to remove child safety locks? First, identify the Type of safety lock 1. Adhesive heat a hairdryer and peel,2. Mechanical uses a key or a button to let it off, 3. Lever and magnetic use a key or a button 4. Fixed unscrew; 5. Knob press buttons, Cleaned residue with alcohol or soapy water.
In this guide, you’ll learn to take off baby locks, remove baby-proof locks, and get rid of baby locks without hurting your furniture or appliances. I’ll explore simple steps for child lock removal, whether you’re dealing with a proof door handle, strap locks, or a handle lock. We’ll also look at ways to handle tricky surfaces like wood and stainless steel. If you need to uninstall child safety locks or remove cabinet safety locks for good, keep reading.
Key Takeaways:
- Gentle methods help remove adhesive baby locks and keep surfaces clean.
- Basic tools can take off childproof locks on fridges, cabinets, and more.
- Patience is vital when you detach baby safety locks or take off drawer locks anywhere at home.
Table of Contents
ToggleUnderstanding Child Safety Locks: A Guide to Keeping Your Child Safe
Child safety locks come in different shapes and sizes. Some are simple plastic latches, while others are strong door lock devices that kids can’t open. Many parents use Wappa baby straps or Safety 1st locks on cabinets, windows, or doors. You might have seen door knob covers that stop kids from opening certain rooms. Others use handle lock or strap locks on fridges or drawers.
Each style aims to protect children from reaching dangerous items or wandering into places they shouldn’t go. A lever lock, for example, stops a child from pulling down a door handle. A proof door handle might involve a plastic shell that turns freely in a child’s hand. Cabinet locks sometimes rely on strong adhesive pads that stick tight. These designs are great for childproofing, yet they become a hassle when you want to remove baby-proof latches or take off childproof locks later.
Did You know? According to data from U.S. hospital records, over 25,000 children under age 5 visit emergency rooms each year after swallowing or touching unsafe household products. Many of these incidents happen in unsecured areas, such as cabinets without child safety locks. A lock can block kids from opening a door to cleaning supplies or sharp objects.
Many locks are tough because they’re built with strong materials. 3M adhesive is common and can be hard to peel. Screws also play a role, which makes the lock extra secure. Once your child is older, you may want to take off appliance safety locks, remove childproof door locks, or simply unlock the spaces your child no longer bothers. At that point, it helps to know the type of lock you have. Different products might need different tools, whether you’re working on a window, a fridge door, or wooden cabinets.
Understanding how these locks function gives you a big advantage. It also helps you pick the right method to remove child safety locks without damaging surfaces. Basic knowledge of screws, adhesives, and lock components prevents you from scratching paint or leaving sticky patches.
Tools and Preparations for Installing Child Safety Locks
A little prep work can make child lock removal smoother. Collect a few basic items before you start. These can help with remove adhesive baby locks, take off drawer locks, or any other childproof locks around the house.
- Screwdriver (Flat or Phillips): Some cabinet locks and door lock styles have small screws. A screwdriver sized to fit their heads prevents damage and makes them easier to remove.
- Hairdryer or Low-Heat Gun: Warm air loosens sticky pads on items like Wappa baby or Safety 1st products. Point the dryer at the lock for a few seconds.
- Plastic Card or Putty Knife: A thin edge slides under adhesives and pries them off. This helps avoid sharp scratches on wood or metal.
- Mild Cleaner or Adhesive Remover: Rubbing alcohol, dish soap, or products made for goo cleanup work well on leftover stickiness.
- Soft Cloth or Paper Towels: Clean up drips and wipe surfaces.
Place these tools nearby to avoid frantic searches. Then clear the area. Remove any fragile items from counters or floors, especially if you’re dealing with a big door or a fridge. Doing this also gives you enough space to move your arm without knocking things over.
Keep your child in a safe spot, too. You don’t want little ones grabbing parts or pressing hot tools. Quiet time can help you focus on removing baby safety straps, taking off magnetic locks, or dealing with a handle lock in peace. Proper prep sets you up to finish quickly and avoid extra mess.
Step-by-Step Guide to Removing Child Safety Locks
You’ll find four common lock types below. Each section offers a simple plan for taking them off.
How to Remove Cabinet Locks
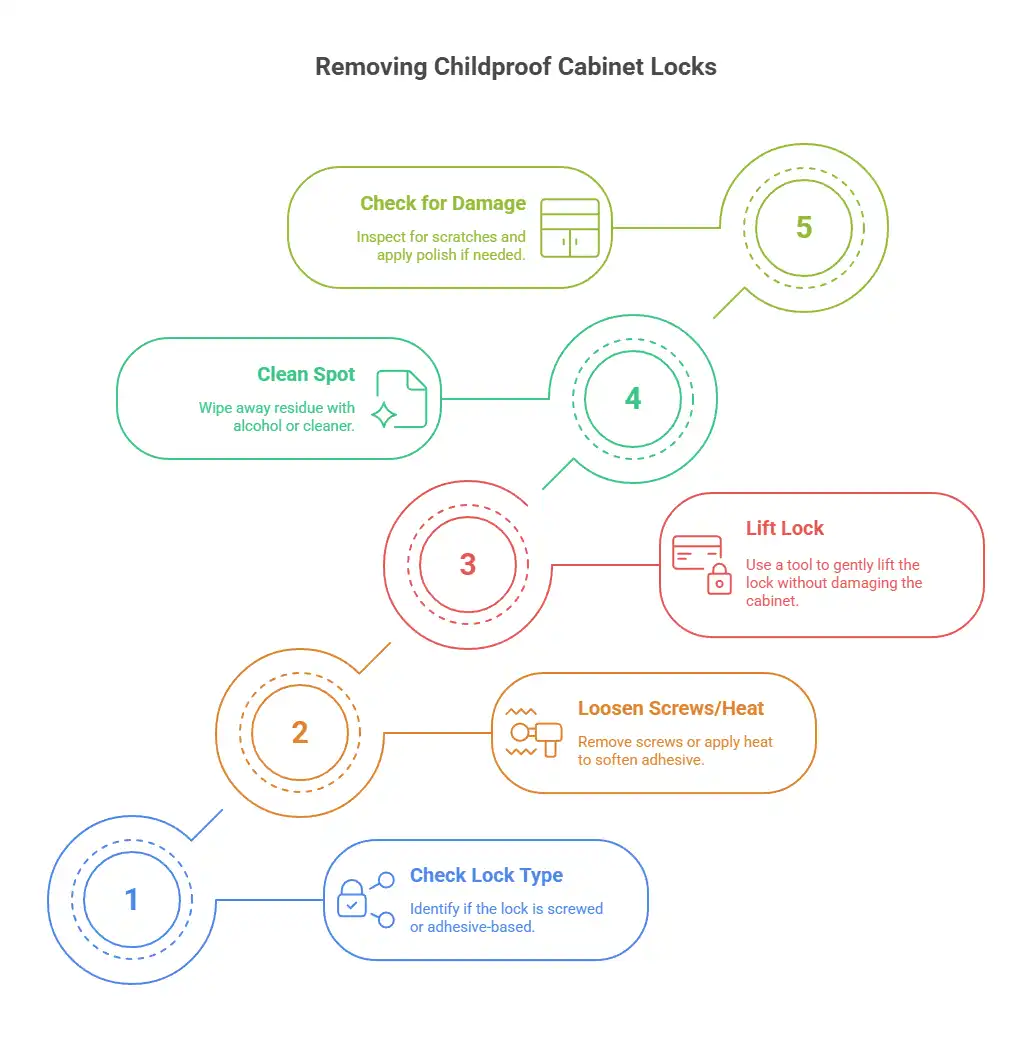
Many people search for ways to remove childproof cabinet locks when kids outgrow them. Some brands use screws, while others rely on sticky pads. Here’s a simple method:
- Check the Lock: Peek inside the cabinet. See if screws hold the lock in place. If yes, grab a matching screwdriver. If it’s an adhesive style, prepare your hairdryer.
- Loosen Screws or Apply Heat: Gently turn each screw until it comes out. If adhesive is involved, warm the area with the dryer for 20–30 seconds. This softens the glue.
- Lift the Lock: Slide a plastic card or putty knife beneath the lock. Move slowly to avoid ripping the cabinet’s surface. Add more heat if it sticks.
- Clean the Spot: After the lock comes off, wipe away leftover goo with rubbing alcohol or a mild cleaner. This step also removes smudges.
- Check for Damage: If the surface looks scuffed, try a bit of furniture polish. Light scratches usually fade with gentle buffing.
This method works for many types of cabinet locks. Patience matters. A tug might tear paint or veneer. If you see that the lock won’t budge, apply warmth again. Some adhesives take extra time, especially if they’ve been on cabinets for years.
How to Remove Child Safety Locks from Wood
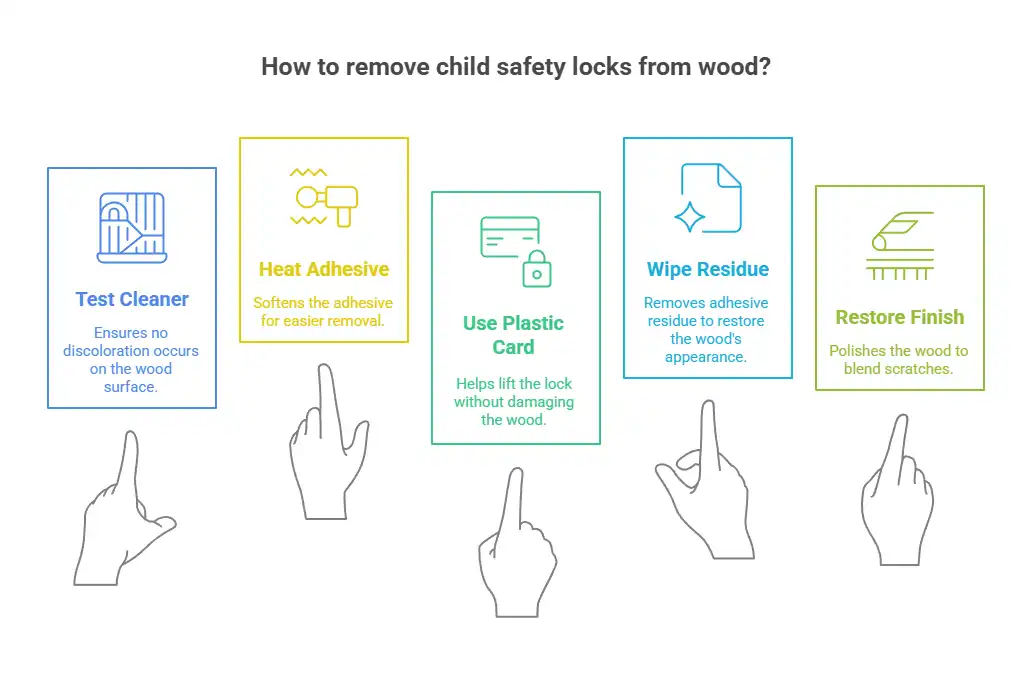
Wood can be delicate. Learning to remove baby-proof locks from a wooden surface calls for caution. It’s not as simple as peeling tape off a plastic fridge.
- Test Your Cleaner: Some polishes or solvents might stain or remove finish. Pick a hidden corner to test. Wait a minute. If there’s no discoloration, proceed.
- Heat the Adhesive Gently: Run a hairdryer on low, aiming at the lock for 30 seconds. Keep the dryer moving so you don’t scorch the wood.
- Use a Plastic Card: Slide the card under the lock. Nudge it a little at a time. If it sticks, warm the area more.
- Wipe Away Residue: Most adhesives leave a film. Dampen a cloth with a safe cleaner or rubbing alcohol. Lightly rub until the glue disappears.
- Restore the Finish: Polish the wood. This step can help small scratches blend in.
Many parents place strap locks or a handle lock on wooden dressers. When it’s time for child lock removal, the key is not to rush. For stubborn areas, apply heat in short bursts. Never hold the dryer on one spot for too long, or you might scorch the surface. Gentle steps protect your wood from permanent marks.
How to Remove Child Proof Locks from Fridge
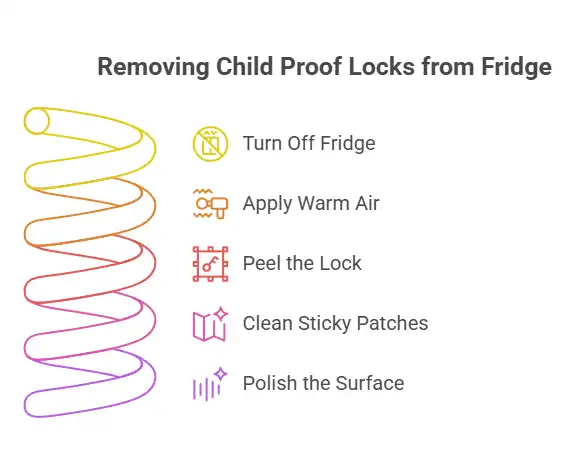
A door lock on a fridge is common for families who want to keep kids from grabbing snacks or messing with the temperature dial. Removing it can be easy with the right technique.
- Turn Off the Fridge Temporarily (If Safe): Unplug or switch it off for a short time. This helps you stay safe and keeps the door from running cold air.
- Apply Warm Air: Aim a hairdryer at the edges of the fridge lock. Move it around to soften the glue. Avoid focusing on one spot for too long.
- Peel the Lock: Ease a plastic card underneath. Lift in small sections. If the lock sticks, heat it again. Rushing can scratch the metal or plastic finish.
- Clean Sticky Patches: Some parents use soapy water or rubbing alcohol to wipe any residue. Gently rub in circles with a soft cloth.
- Polish the Surface: If you have a stainless-steel fridge, apply a mild polish and wipe until it shines. Plastic doors do well with basic cleaner and a dry towel.
Take off magnetic locks on a fridge with the same approach. Some locks click onto the door with magnets, but a sticky pad often helps them stay in place. Warm air and gentle lifting usually do the trick. A safe, slow pace keeps your fridge looking good.
How to Remove 3M Adhesive Baby Locks
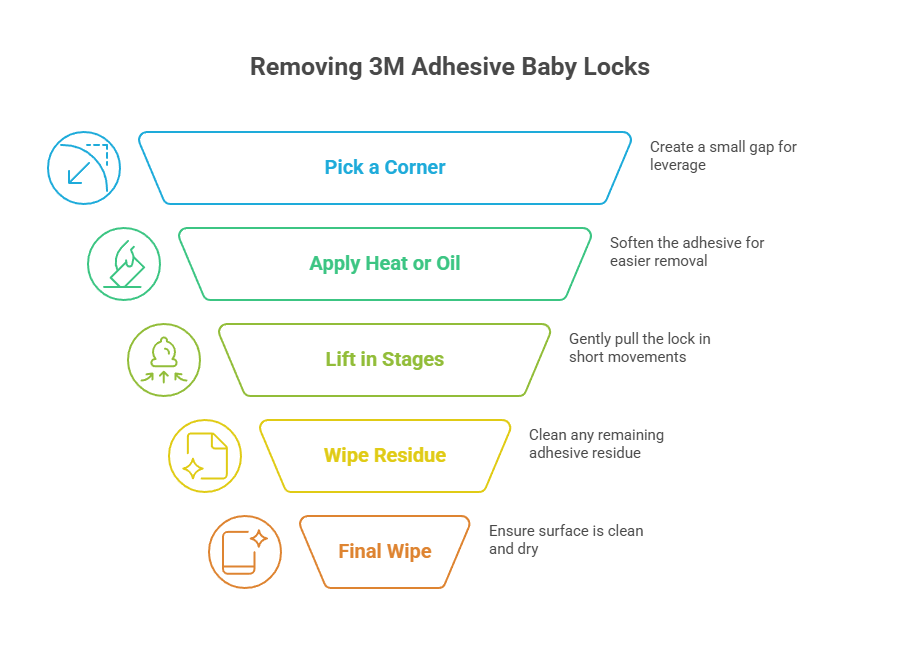
3M adhesive holds tight. Many families trust this brand for childproofing. When you want to remove adhesive baby locks, you might feel stuck at first. The steps below help loosen it.
- Pick a Corner: Gently lift the corner of the lock with your fingernail or a plastic card. Create a small gap.
- Heat or Add Oil: Point a hairdryer at the gap to soften the glue. Some parents dab cooking oil or vinegar around the edges to break down the adhesive.
- Lift in Stages: Pull the lock in short movements. If you meet resistance, warm it again or add more oil.
- Wipe Away Residue: Sticky glue can linger. A bit of rubbing alcohol on a cloth often removes leftover bits.
- Final Wipe: Use a damp towel to finish. Dry it fully so no moisture stays behind.
3M adhesives are famous for their strong hold. This is great for baby-proof door handles or other spots where kids push and pull. When it’s time for child lock removal, try not to yank. Gentle lifts and a few passes of heat or oil usually work. The lock should let go without harming your cabinets or appliances.
DIY Tips for Dealing with Stubborn Child Safety Locks
Some locks refuse to budge. You may need a few creative tricks for remove baby-proof door handles or take off appliance safety locks that have stuck around for years.
- Dental Floss Method: Slip a piece of floss behind the lock. Pull it back and forth like a saw. This motion cuts through adhesive without using a blade.
- Oil Soak: Place a small amount of cooking oil around the edges of the lock. Wait a minute or two. Then pry it with a plastic card.
- Slow Heat Cycles: Warm the lock for 15 seconds, pause, then warm it again. Repeating short bursts keeps heat from building up in one spot.
- Light Tapping: Some baby locks have latches that click into place. A few gentle taps with a blunt tool might free them if you see a jammed piece.
Many parents have faced the challenge of removing baby safety straps or dealing with a tricky proof door handle. These locks are strong for a reason: they keep little hands out of cabinets or away from the fridge. If your lock is still not moving, take a break. Return with fresh eyes. Patience goes a long way when you want to get rid of adhesive locks on prized furniture or appliances.
Cleaning and Restoring Surfaces After Installing Child Safety Locks
Sticky spots or light scratches often appear after you uninstall child safety locks. A fast cleanup can return your home to a neat look.
- Wipe Residue: Soapy water or a gentle adhesive remover is enough for leftover glue. Rub in small circles with a soft cloth.
- Polish Metal: Stainless steel fridges or ovens might show smudges. A store-bought polish or plain vinegar with water can help. Dry the area with a microfiber towel.
- Wood Care: Dab a bit of furniture polish on a clean cloth. Rub the spot in gentle strokes to restore the color or shine. If scratches remain, a touch of matching wood marker can hide them.
- Avoid Harsh Scrapers: Metal blades can gouge or leave lines. A plastic card is better for any last bits of gunk.
- Check Appliance Surfaces: If you used oil or vinegar on plastic or metal, wipe it down fully. No oily film should stay on handles or edges.
Tending to surfaces right away prevents sticky buildup. It also keeps your home looking fresh. No one wants to see grimy outlines of old strap locks or childproof door locks on cabinets and appliances. A good cleanup leads to a smooth finish, whether you had to remove baby-proof latches from a fridge or peel off childproof cabinet locks from drawers.
Common Mistakes and FAQs
Rushing is a big problem. Some people yank locks off and end up scratching their furniture or ripping off paint. Using strong chemicals can also cause stains, especially on wood or plastic. There’s no need to hurry. Gentle moves often solve these issues without causing damage.
FAQs
Many locks have a hidden tab. A small flathead screwdriver or a strong fingernail can push it. You might find instructions on the brand’s website, like Safety 1st.
A razor can scrape surfaces, so it’s risky. A plastic card is safer. Only use a blade if you have no other choice, and move it gently.
Extra warmth or repeated oil soaks can loosen old glue. Give each step time, and the lock will lift.
For child lock, navigate to Settings > Parental Controls or Screen Time, enter your PIN, and turn off the restrictions. Forget your PIN: Reset it in your account settings or contact customer support for assistance.
Holding both sides of the cover tightly, twist counterclockwise and pull off. If it is stuck, use a butter knife or other flat tool to gently pry it open. Some models need hidden tabs pressed inside — consult the manufacturer’s directions.
For removing Safety First adhesive latches, heat the adhesive with a hairdryer on low to soften it, then peel it off gently. If sticky residue remains behind, rub the surface well with warm soapy water or an adhesive remover like Goo Gone
How to remove child safety locks without a key?
Will a razor blade help with adhesive?
What if the lock has been on for years?
how to take off child lock on your phone?
How to get child safety lock off door knob?
How to remove Safety first adhesive Cabinet and Drawer Latches?
Remember that child safety locks keep kids safe when they’re small. Once they outgrow these locks, or you need to get rid of baby locks, a calm approach will protect the look of your home. If you get stuck, step away. Come back once you’ve rested, or look up more details about the specific lock brand.
Conclusion
How to remove child safety locks doesn’t have to be hard. Gather a few tools, apply heat or gentle force, and lift the lock in small steps. This method works whether you want to remove baby-proof latches, take off childproof locks, or detach baby safety locks on wooden furniture, stainless steel, or plastic.
I’ve seen good results when people stay patient and clean up right after. A soft cloth and a mild cleaner handle leftover glue. Your furniture or appliances will look fresh again with simple steps. If these tips helped you take off baby locks or remove cabinet safety locks, share them with other parents who might need a hand. Passing along these ideas can help everyone enjoy a tidy, kid-friendly home without extra worries.


